With the development of impressive technology adding customization attributes to your phones has become easier than before. Moreover, numerous tech enthusiasts are entering the arena of custom ROM by modifying the system files. If you also want to Root Samsung Galaxy S24, then the following post will go through the entire procedure.
However, rooting any device could be a daunting task, especially when you don’t have prior knowledge about the resources. Besides this, it requires meticulous preparation and the right set of tools for unleashing the true potential. Therefore, let’s not wait further & head toward the guide!
How to Root Samsung Galaxy S24?
Before getting started with the subsequent guide, there are a handful of risks to altering the system files. Whether you talk about bootloop or completely brick the device. But if you properly follow the upcoming instructions to reduce the error percentage.
Warning: Rooting OS isn’t reasonable for physical or software damage that happens to the reader’s device. Read all instructions properly to avoid any trouble.
There is a list of things that you need to download and install to unlock those amazing system privileges. Worry not! We tailored the whole list that help the users receive root access on their Samsung Galaxy S24.
- First of all, the readers need to create a complete Andriod device Backup.
- Besides this, a USB cable and computer/laptop are a must to start the process.
- Next, download and install the latest Samsung Android USB driver.
- Get the appropriate version of your Samsung device’s firmware.
- Other resources like Magisk and Odin Flash Tool are also needed.
Apart from this requisite, it’s recommended to follow each of the upcoming steps with great precision since a single mistake can cause problems for readers. Now you have grabbed all of the necessary tools, let’s dive into the ultimate Root Samsung Galaxy S24 guide.
Step 1: Access Developer Mode
The crux of this whole process begins with unlock the developer settings. As usual, these system settings will provide more control over the interface from advanced customization to simply tweak with the refresh rate. Multiple things can be performed using this mode. Now, let’s see the process to access it!
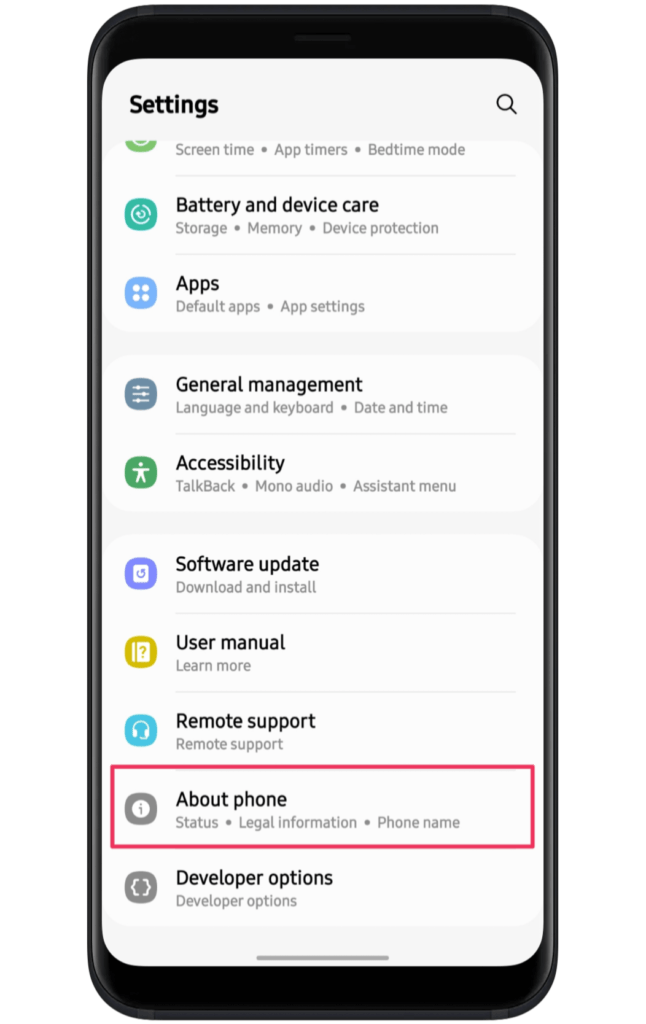
- First and foremost, launch the Settings App.
- Now, look for the “About Phone” option and select it.
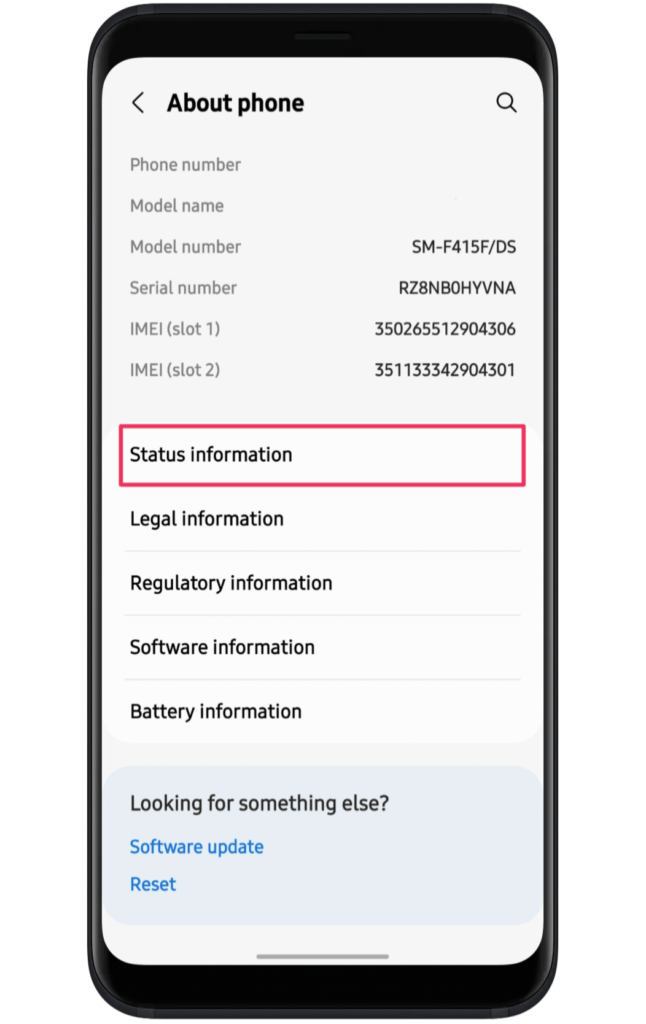
- Next, click on “Software Information” from the list.
- Following this, tap on the “Build Number” more than 6 times.
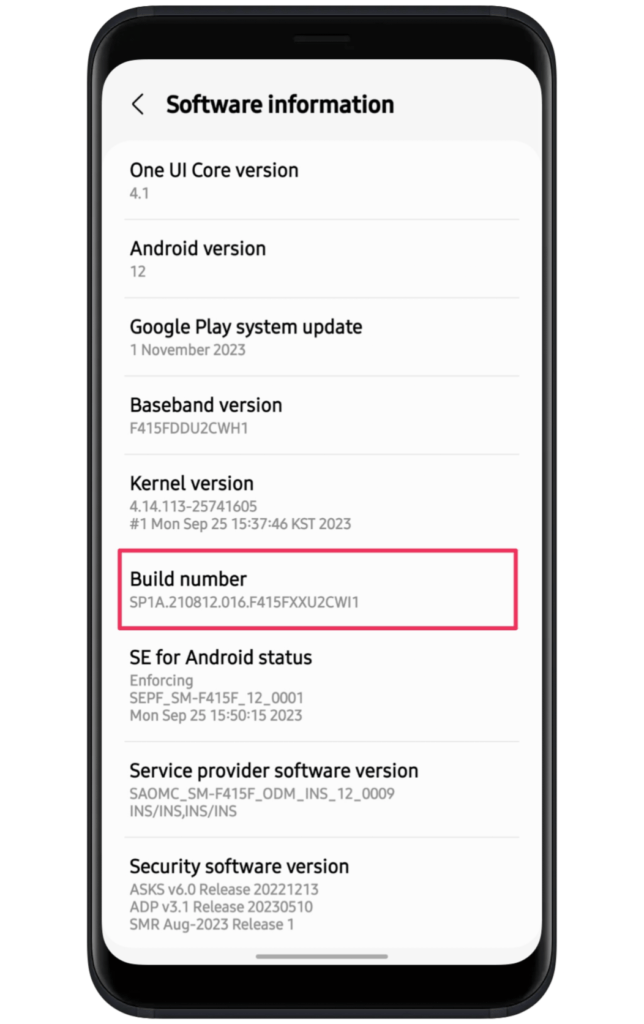
- Finally, you will gain developer settings access.
Now, open the developer settings and enable OEM Unlocking and USB debugging toggle. With this, users can effortlessly connect their devices to a PC in just a few seconds. Plus, it would be quite helpful for the upcoming process.
Step 2: Unlock the bootloader settings
If you want to apply some serious changes inside interface, you can utilize fastboot mode. In Samsung devices, you will receive download mode, which allows users to run system commands in the background. Besides this, activating this mode is also quite easy.
Note: Accessing download mode will cause a complete data wipeout, so make sure to back up your phone data before starting to follow the subsequent method.
Simply turn off the device, click both volume buttons, and connect to the PC using a USB cable. But if you want to know the whole process in detail, then we suggest you check out our unlock bootloader for any Android phone guide in the meantime!
Step 3: Download Galaxy S24 firmware
In this section, we will understand the whole process of downloading your Samsung phone firmware. For this, you need to know the “Model Number” of your smartphone. It’s easily available in the Settings → About Phone.
Once you have obtained the model number, the next course of action would be to get the firmware file. Generally, you will find various sources on the internet that provide correct file versions. But if you are especially looking for a Samsung Galaxy S24 phone, then visit the SamFw website.
- Open your Browser application on your computer or laptop.
- Access the official SamFw website Homepage.
- Now, enter the “Model Number” inside the empty box.
- Finally, download the firmware file based on your region.
Step 4: Create A Copy of AP files
From the previous step, we assume that you have downloaded the correct firmware using the above source. Afterward, you need to extract this file and access the firmware folder.
- Extract the firmware using available unzipper tools on your PC.
- Copy the AP file and transfer it to your internal storage.
Step 5: Extract and Transfer the Patched File to the PC
In the next part, the users need to download the Magisk App on their Samsung devices. Once the installation process ends, follow the given instructions to extract a patched file through the magisk.
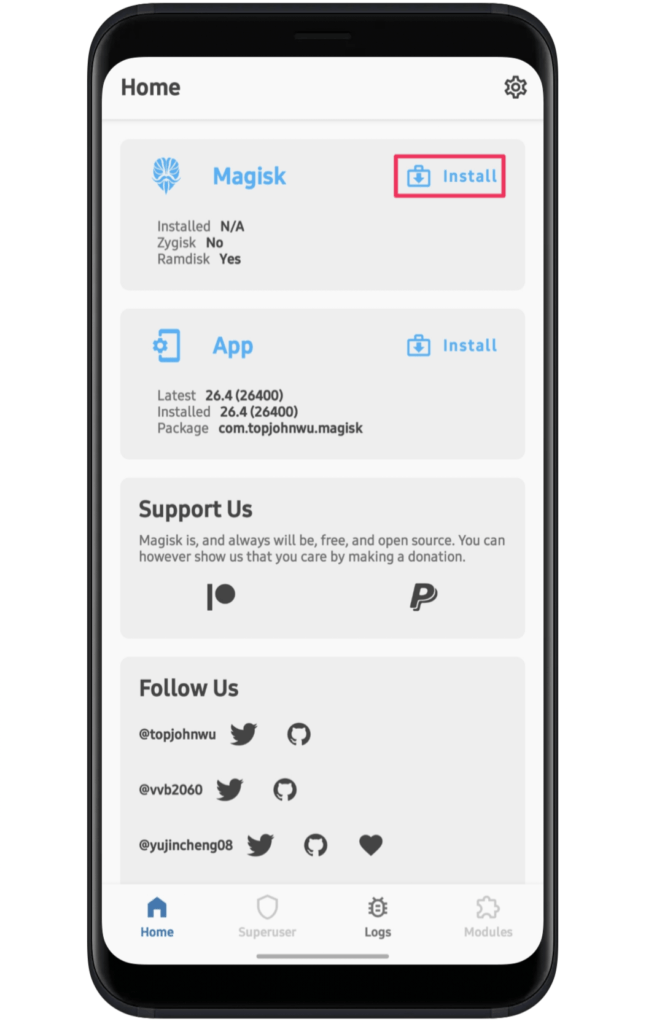
- Launch the Magisk App on your phone.
- Next, you need to click on the “Install” button.
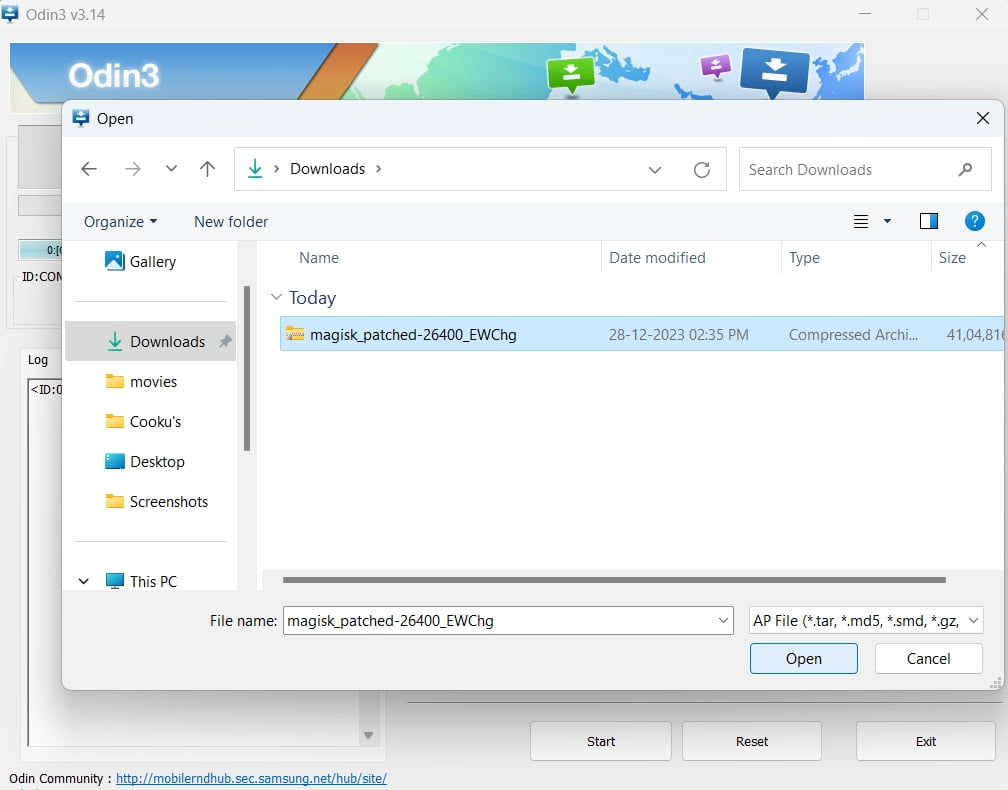
- Click on the “Select A Patch File” option that appears on the next screen.
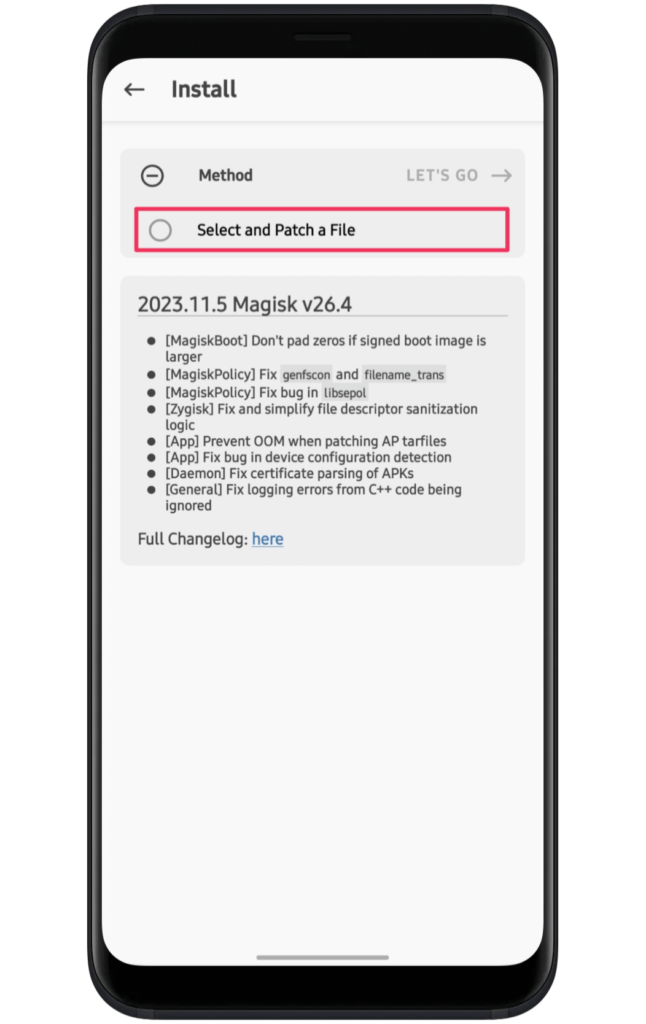
- Now, seamlessly navigate to the AP file location.
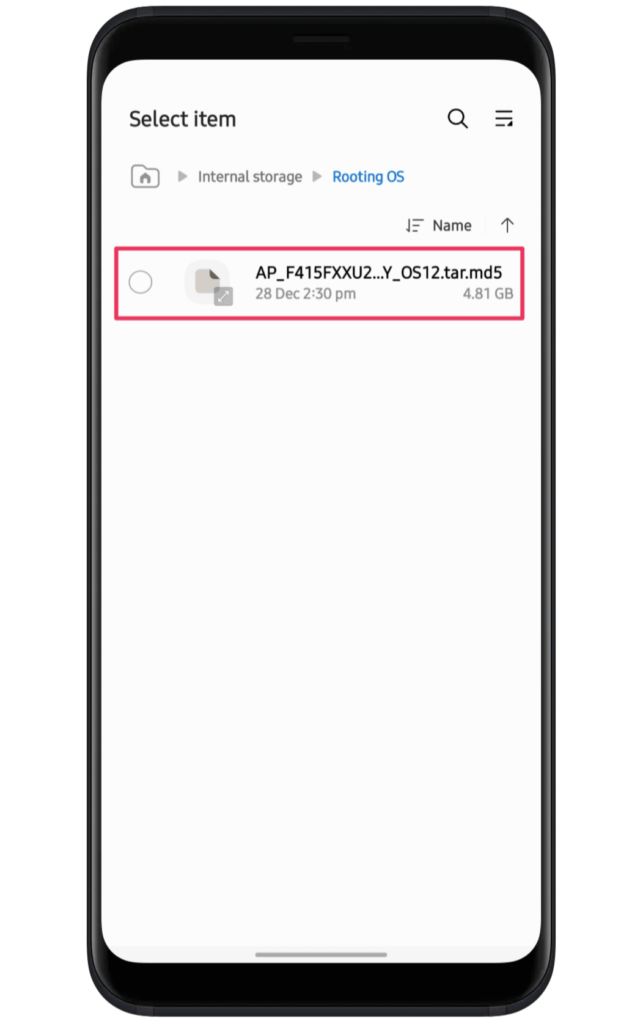
- Select the file and let the software handle the rest.
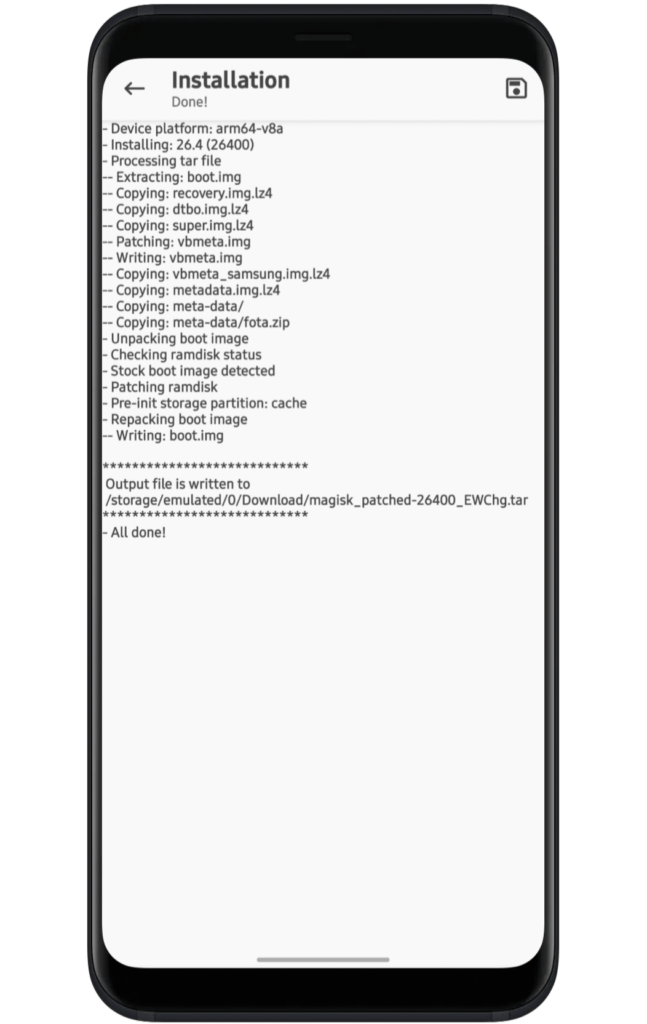
- Finally, a patched magisk file is created on your phone.
The newly patched file is often found in the download section of the internal storage. From here, export this file to your computer, it’s suggested to transfer it to the firmware folder so that you can conveniently use all of the system files in the upcoming flashing process.
Step 6: Put the Device Into Download Mode
- First of all, turn off your smartphone.
- Now, press and hold the Volume Up + Down button.
- Keep holding both buttons and connect your phone to your PC.
- With this, a blue screen will appear with a warning sign.
- Press the Volume Up button to continue with Download Mode.
With the latest generation Samsung phones it’s become quite easier to enter the download mode. But, if you are using an older generation smartphone, then the following steps would be slightly different. Instead of pressing and holding the Volume Up and Down buttons, the users might need to press Power + Bixby + Volume Down or press Power + Volume Down + Home, depending on the model.
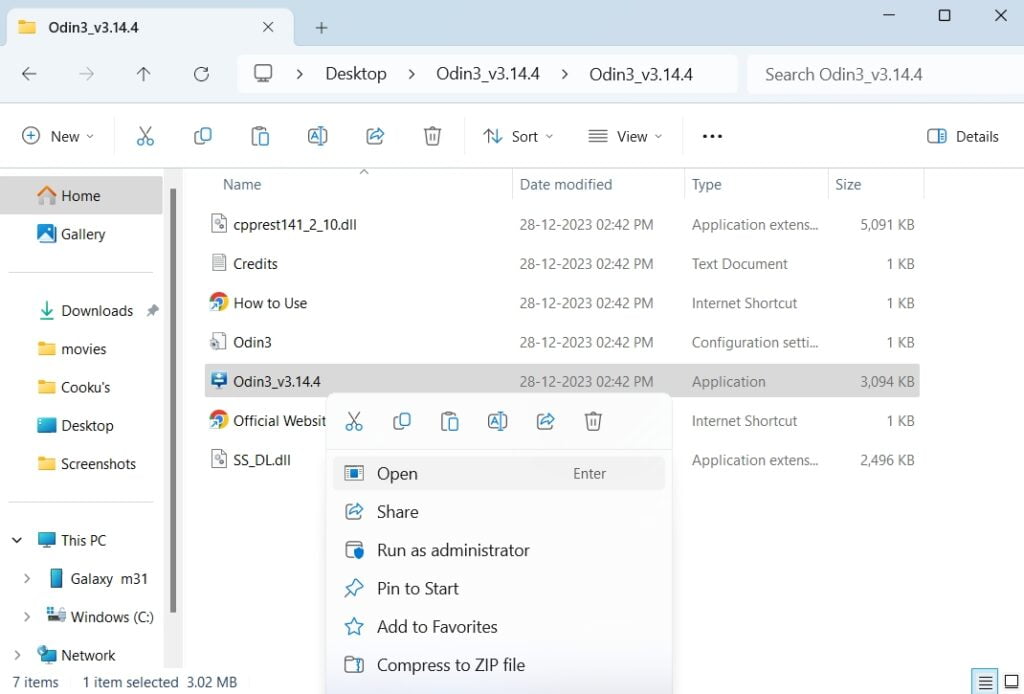
Step 7: Run the Odin Flash Tool
For this part, you will need the Odin Flash Tool installer to patch all of those firmware files on your Samsung phone. With this flashing tool, you can apply root access using the patched Magisk file that we previously extracted. Now, launch the tool and see whether the device is connected or not. If you notice a Blue color box on the left-hand side, then it’s ok!
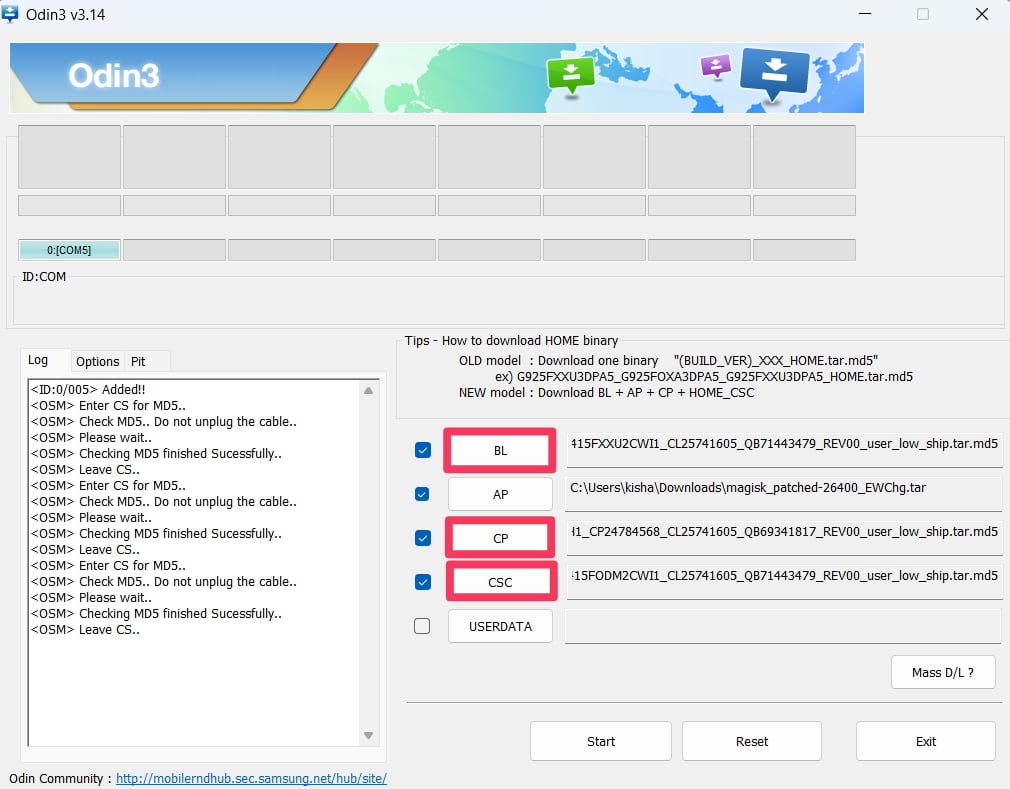
- Open the Odin flash tool and click on the AP button.
- Now, navigate to the patched magisk file location and select it.
- Do the same with the CSC, BL, and CP buttons available in the Odin tool.
- Next, you need to add CSC, CP, and BL files from the firmware folder.
- Finally, press the “Start” button and wait till the flashing process ends.
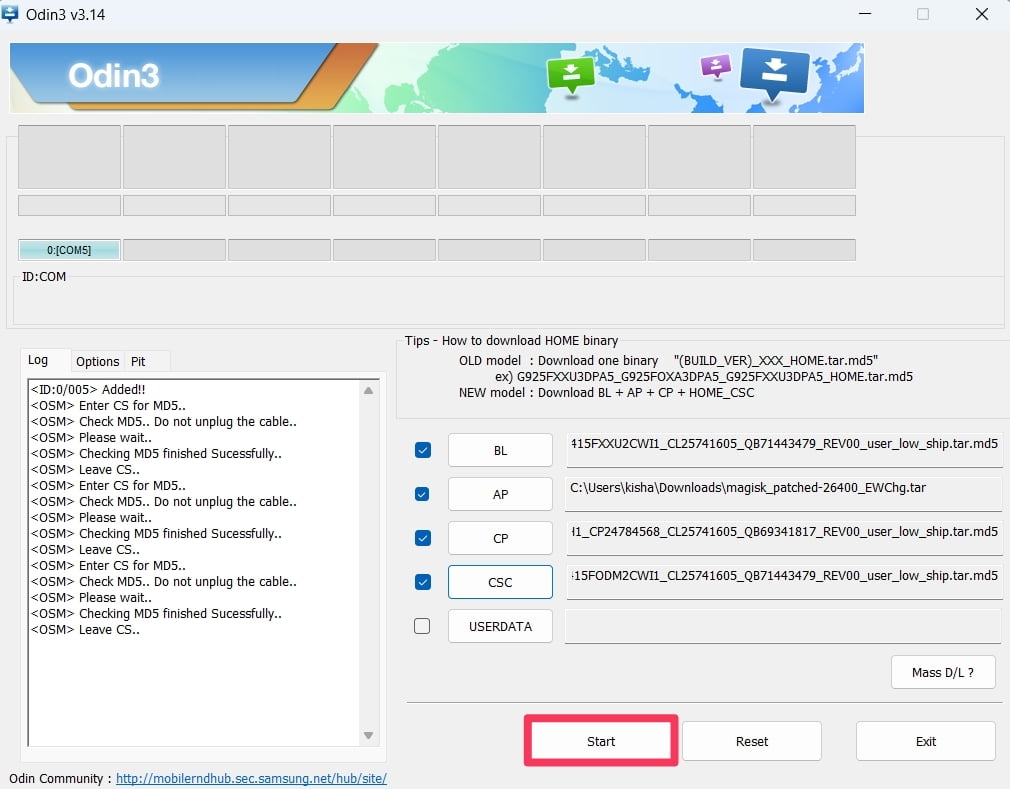
At last, reboot your Samsung phone and install RootChecker app to confirm root access.
Note: If you are using a corrupt firmware file or, patched file, the device isn’t connected properly, then you will notice an error message on the Odin Flash tool. Thus, make sure to double-check everything before you dive into the rooting process.
Final Thoughts:
If you follow everything properly till now, you have achieved the root access on Samsung Galaxy S24, At the same time, you can easily install custom ROMs and modify UI as per your wish. For queries and other doubts, our doors are always open.