The OnePlus Nord 5 has swiftly established itself as a top contender in the smartphone market, offering great features and performance at a competitive price.
However, for individuals who want to take their device’s customization and control to the next level, rooting is the best option. In this post, we’ll go over how to root your OnePlus Nord 5, allowing you to fully customize your device and personalize it like never before.
How to Root OnePlus Nord 5?
Generally, it’s possible to unlock the root access using custom recovery and Magisk. But if you want stable and secure usage, the best option would be to create a patched image file using the OnePlus firmware. Worry not, we covered important tools so that you can easily walk through the instructions.
Basic Requirements
Here are things that you need to keep an eye on before starting the rooting process.
- Start with taking a complete Android phone backup using our guide.
- You are also required to unlock the bootloader of the OnePlus Nord 5.
- Download and install the platform tools and ADB/fastboot driver.
- Get the appropriate version of OnePlus firmware according to your phone.
- Install the latest Magisk App to attain root access permission.
Warning: Rooting has serious consequences such as bootloop, brick, lagging, and slow performance. If you’re already aware of these factors, only head toward the upcoming process and follow the guide at your own risk!
Step 1: Access Developer options
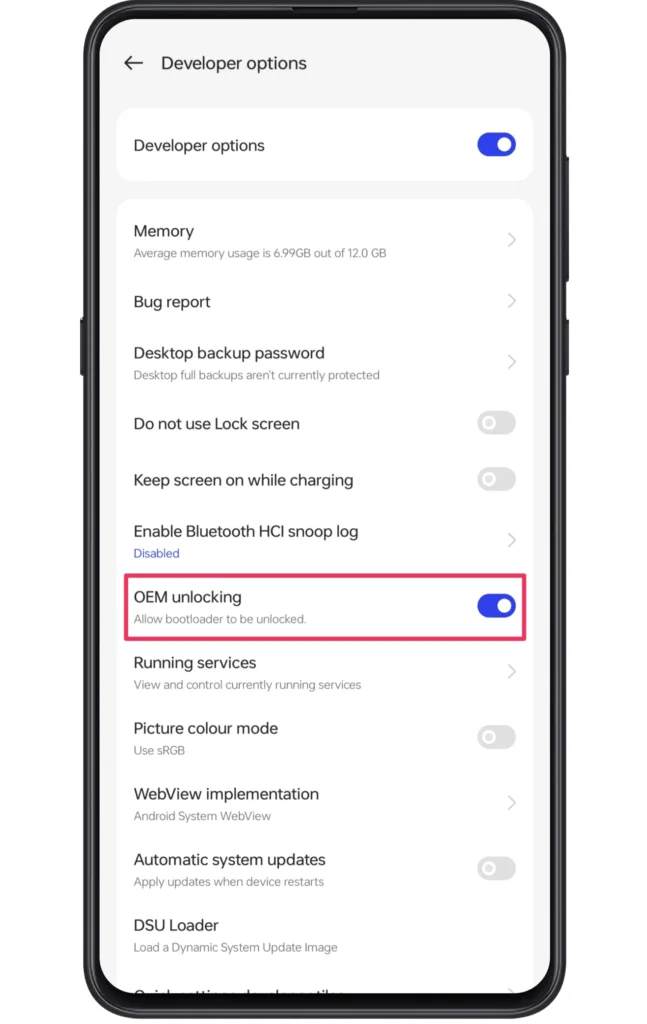
To start, you need to gain access to the developer options and eventually enable the OEM unlocking. So, let’s have a look at those instructions.
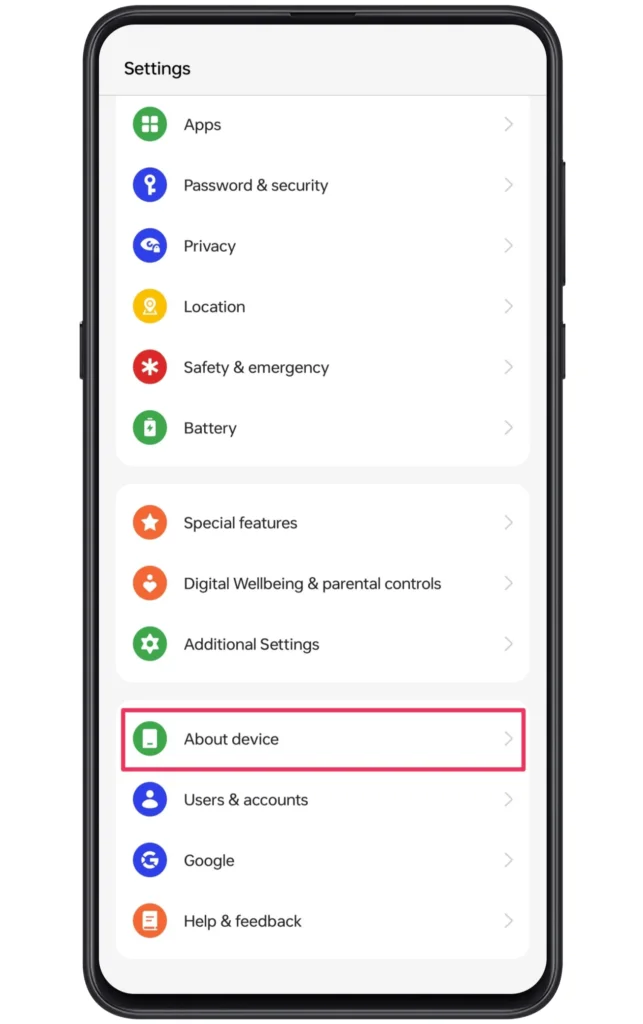
- Open the Settings App and scroll down to About Device.
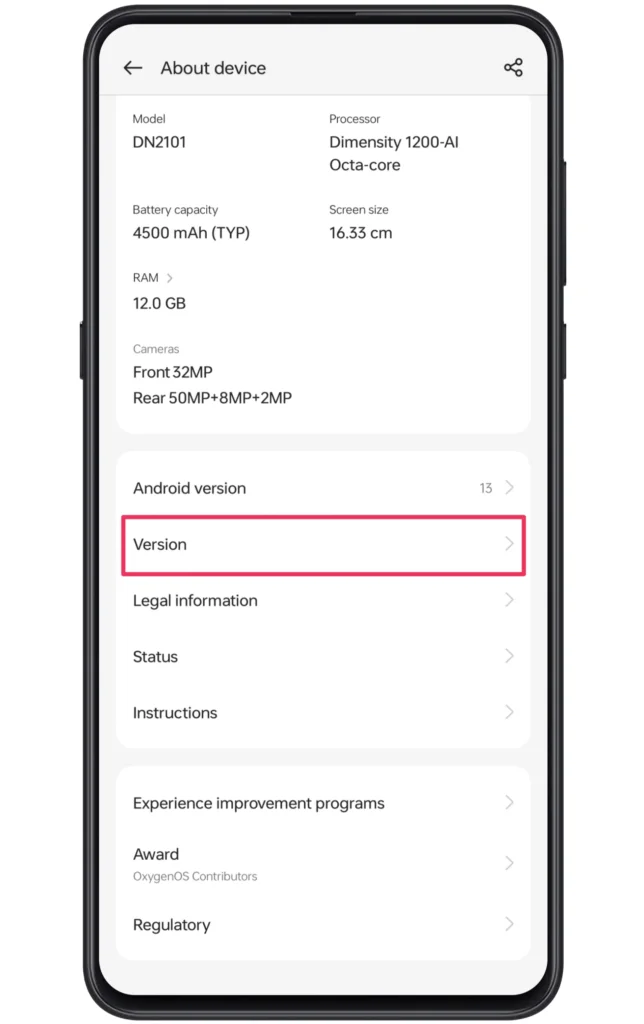
- In the About Device settings, select the version option.
- Following this, tap on the build number more than 6~7 times.
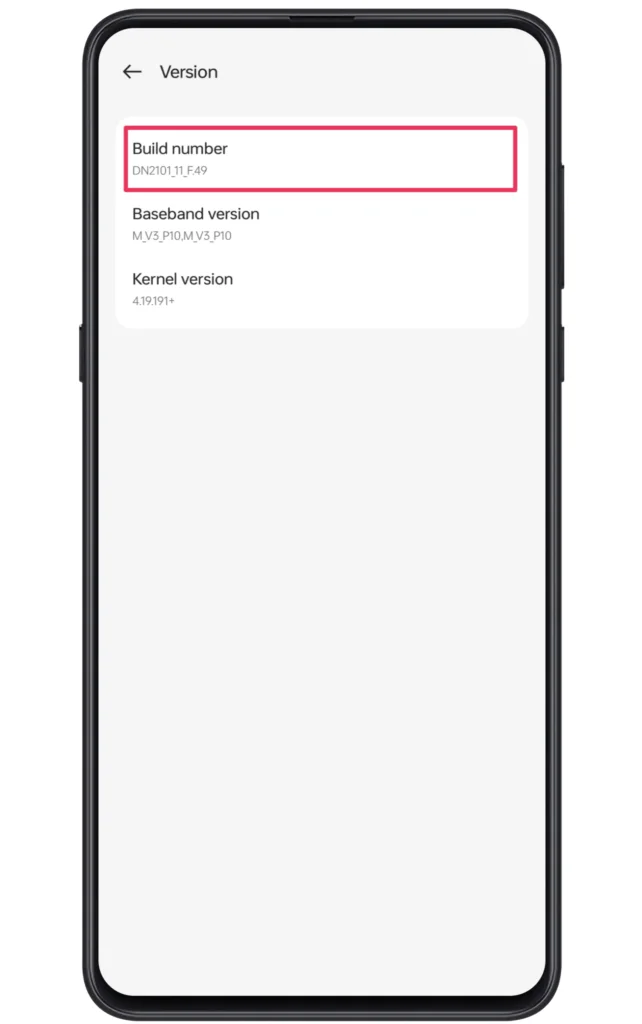
- With this, the developer options will be active.
- Now, open the Additional Settings >> Developer options.
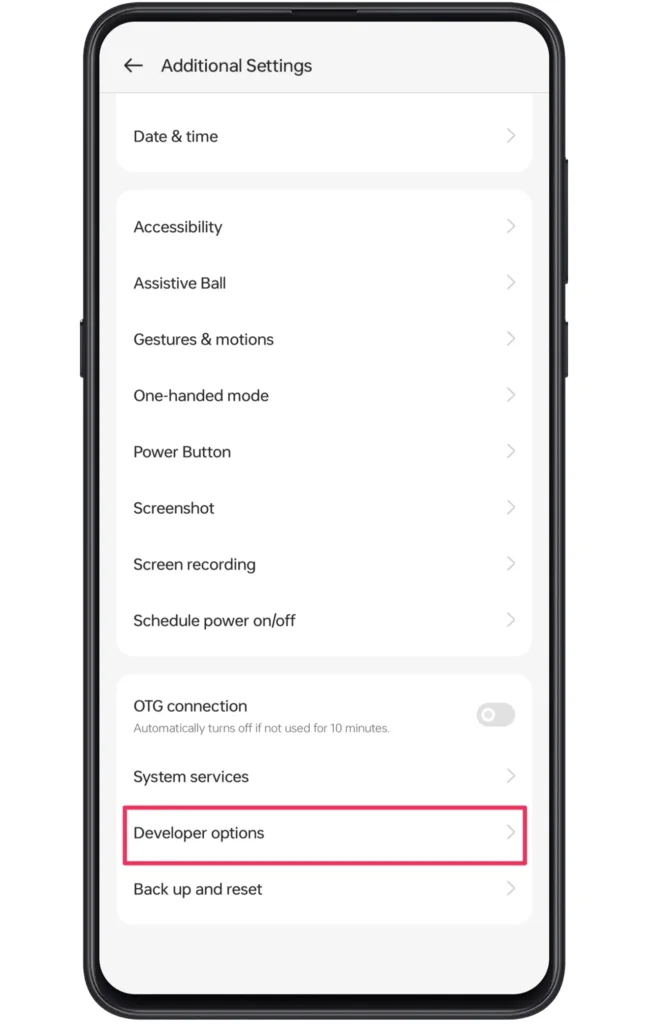
- Allow USB Debugging and OEM unlocking toggles.
Step 2: Unlock the Bootloader Settings
After you have gained developer options access and enabled the necessary settings, you can move toward the bootloader unlocking process. In general, you are required to utilize fastboot/adb commands to unlock those system configurations.
Although it may be a lengthy procedure. Still, it would be great if you follow our guide to unlock bootloader on any Android phone. After completing those instructions it would be easier to follow the upcoming steps in a hassle-free manner.
Note: The upcoming procedure can wipe out your smartphone data completely, thus it’s essential to create a backup of important data before you dive into bootloader unlocking process.
Step 3: Obtain OnePlus Firmware
The rooting requires an image file that will assist in creating a patched flash file. Typically, you will obtain this file through the firmware zip. Yet, finding the OnePlus firmware file is comparatively easier than other brands as the readers can visit the OnePlus service page to receive a preferred firmware version according to your phone model.
If you didn’t find your OnePlus model on the official site, then it’s suggested to check out alternative options like the Oxygen Updater app. But make sure to check the build number before starting the downloading process.
- Once you have downloaded the OnePlus Nord 5 firmware.
- Extract the firmware file using 7-zip or another unzipper tool.
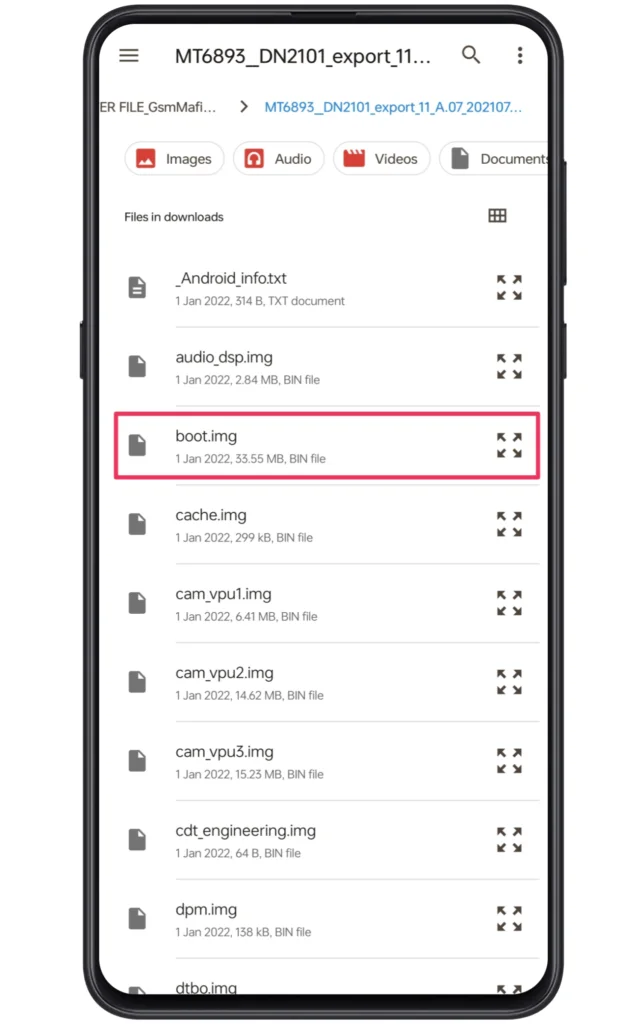
- Open the folder and copy the boot file to your phone.
Note: You need to download these files on your computer/Laptop.
Step 4: Create a Magisk patched file
The next step will include installing the magisk software installation. We are assuming that you have already downloaded and installed the latest version on your phone. If not, do it as soon as possible. After completing the installation process, you can take a look at the following instructions.
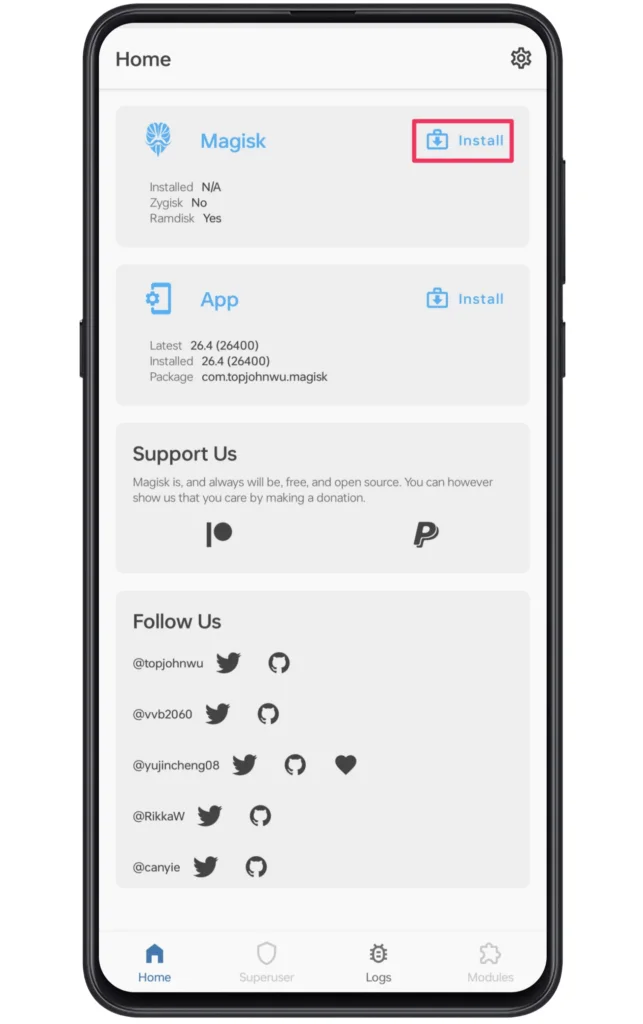
- Launch the Magisk App on your phone.
- Click on the Install button appear on the home screen.
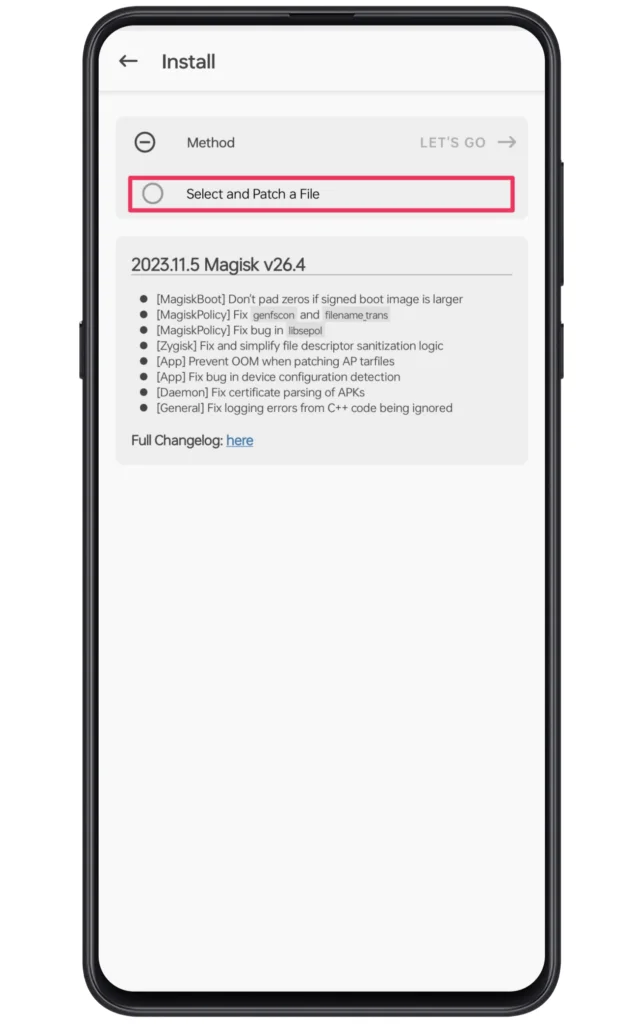
- Tap on the “Select the Patch a File” and click on Let’s Go.
- Now, navigate to the boot file location and select it.
- Wait till the patching procedure is taking place.
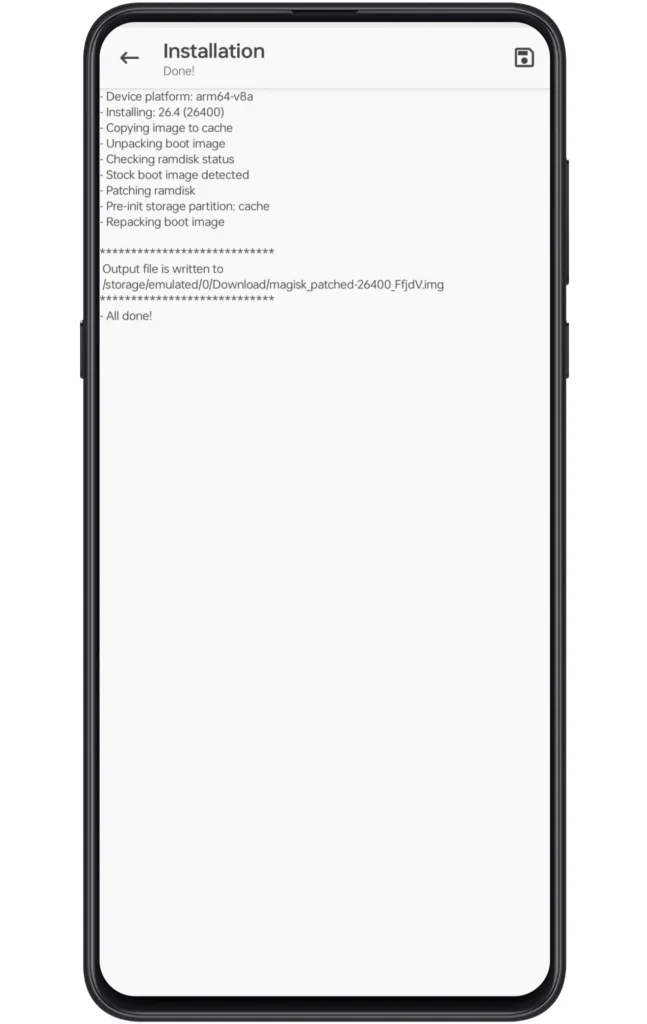
- A magisk_patched file will be available in the download folder.
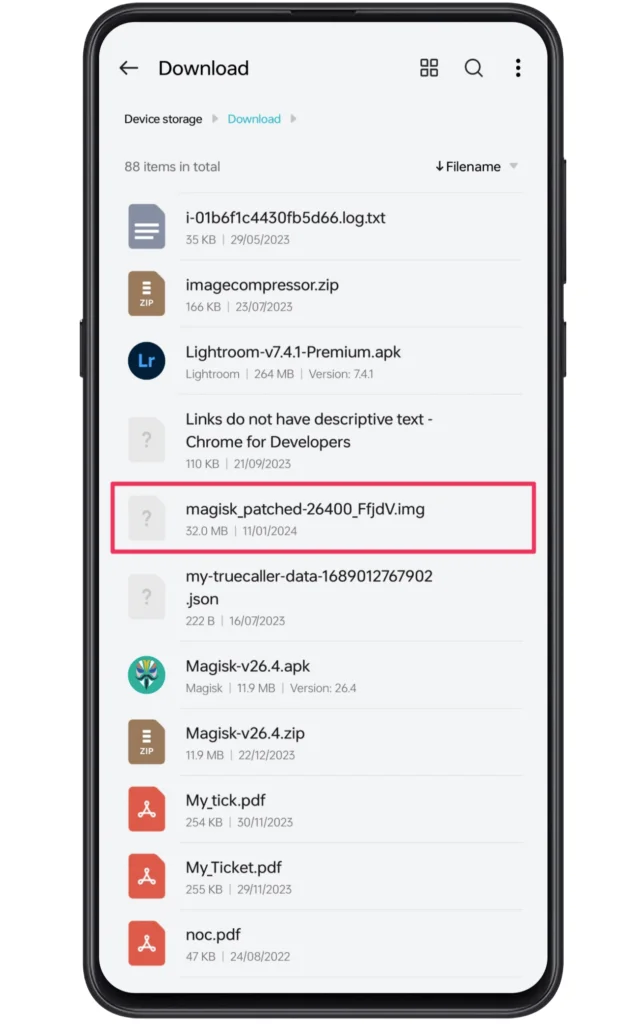
- Lastly, transfer this file to your PC or laptop.
Step 5: Run Fastboot Commands
There are two sets of commands that we are going to use. The first one would be the ADB commands and for the latter one, we will use Fastboot commands.
Note: You need to rename the original file name to magisk_patch.img for your convenience and transfer the patched file to the platform tools folder.
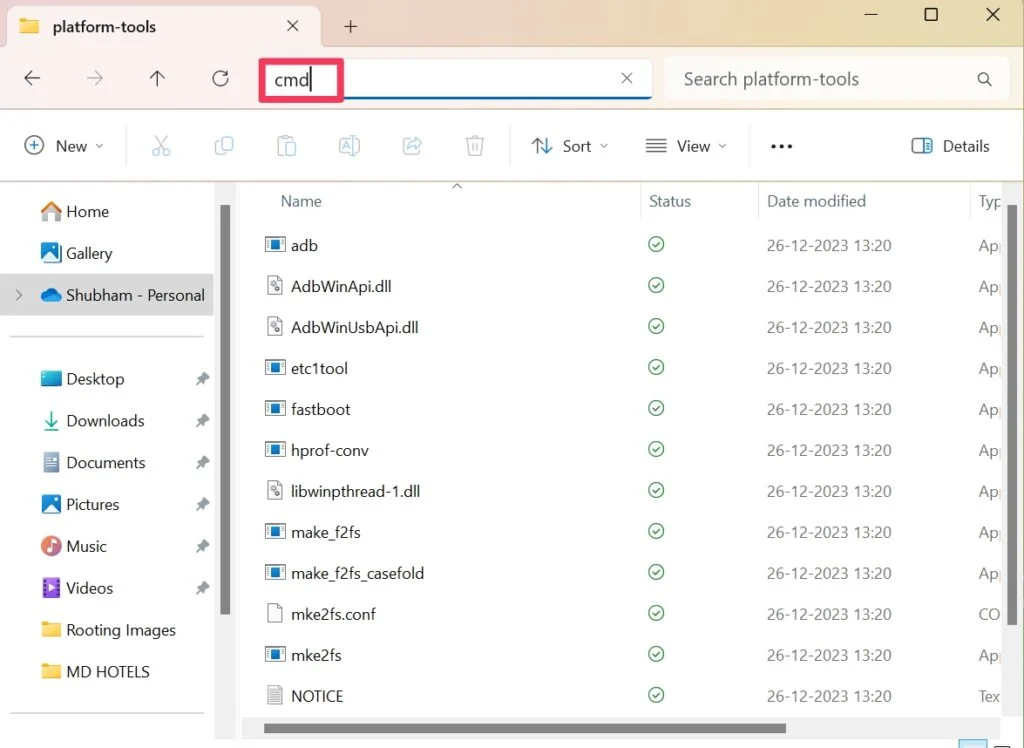
- Open the platform tools folder.
- Type “cmd” in the navigation bar and press Enter.
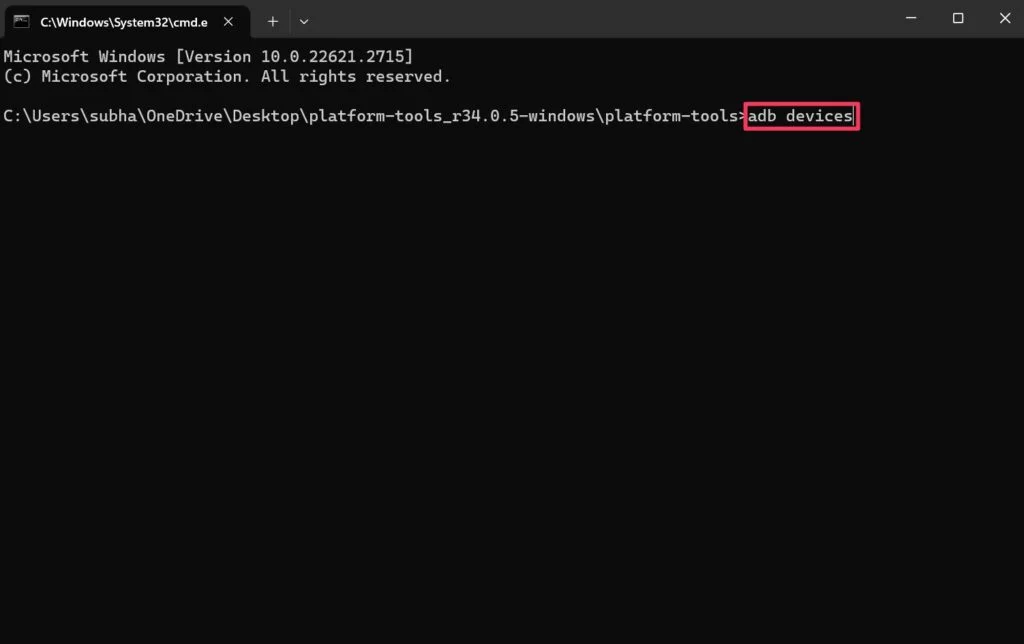
- Now, type “adb devices” to confirm phone presence.
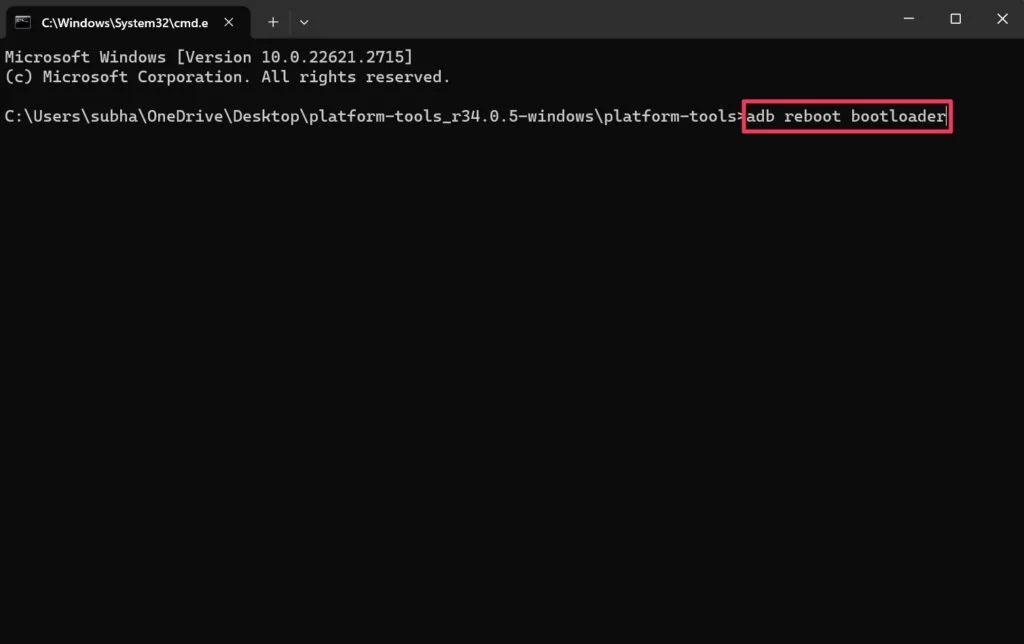
- Then, type “adb reboot bootloader” to boot into fastboot mode.
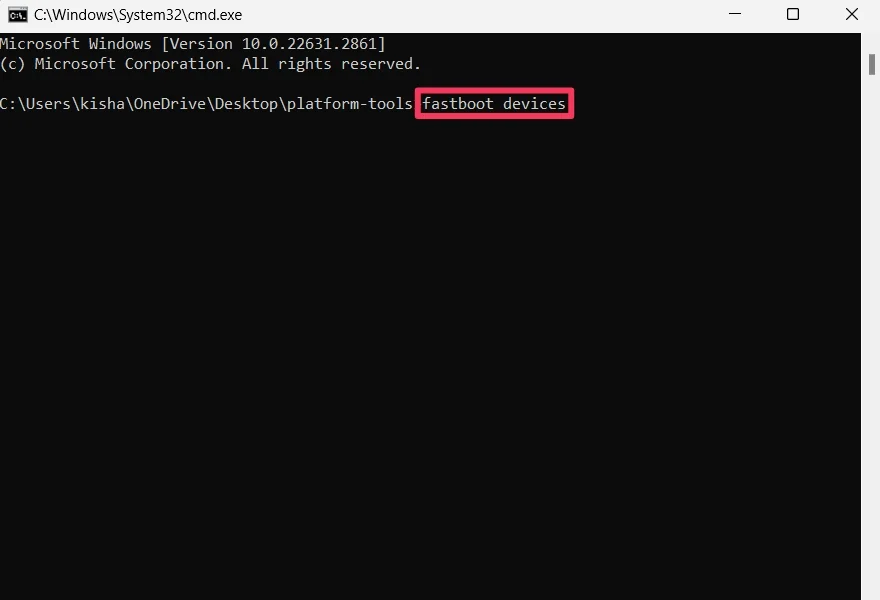
- Next, type “fastboot devices” to verify your device in fastboot mode.
- Afterward, type “fastboot boot magisk_patch.img” and press enter.
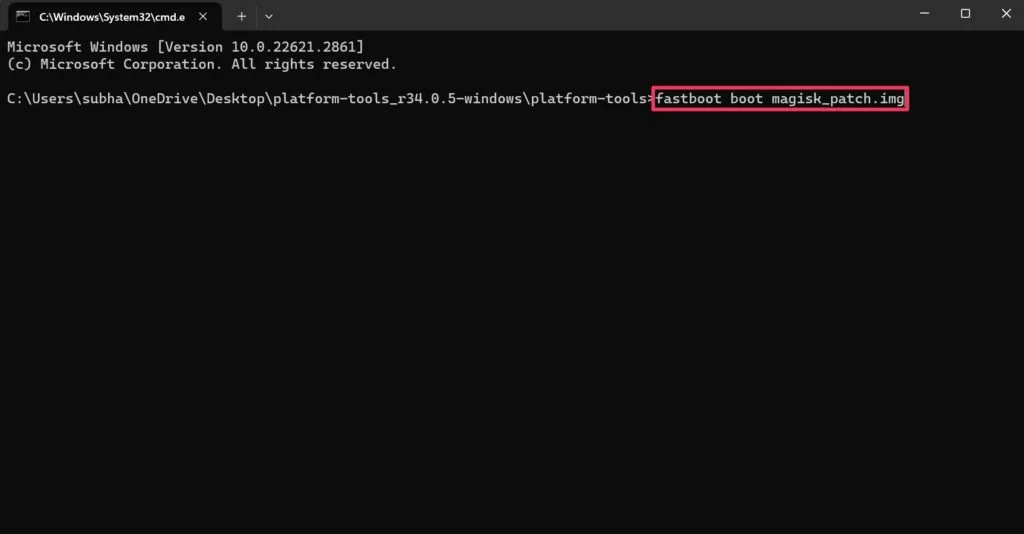
After finishing those instructions, the device will boot and eventually, you will attain the temporary root access. Again, you are required to launch Magisk and click on “Install”.
But this time, you will notice the “Direct Install” option in the list. Following this, choose this option to acquire permanent root access by simply clicking on the Let’s Go button. Once the entire procedure ends, you will gain root privileges.
Step 6: Confirm Root OnePlus Nord 5 Access
The final stage of this process would be confirming the root permission on your phone. For this, you need to download a third-party app known as the Root Checker, which will render correct information about the device. In that case, the given steps will provide you a proper instructions to use this app. So, let’s get started!
- Launch the Root Checker App on your phone.
- Following this, click on “Agree” to the disclaimer notice.
- Finally, find whether your device is successfully rooted or not!
How to unroot the OnePlus Nord 5?
Undoubtedly, rooting with the magisk app is the most convenient way to attain root access. With this, even a newbie and veteran can gain those system-setting benefits with relatively less risk. But at the same time, rooting your phone is also quite straightforward. Follow the given instructions to retrieve the previous configuration.
- First of all, open the Magisk App on your phone.
- Next, you need to click on the “Uninstall Magisk” button.
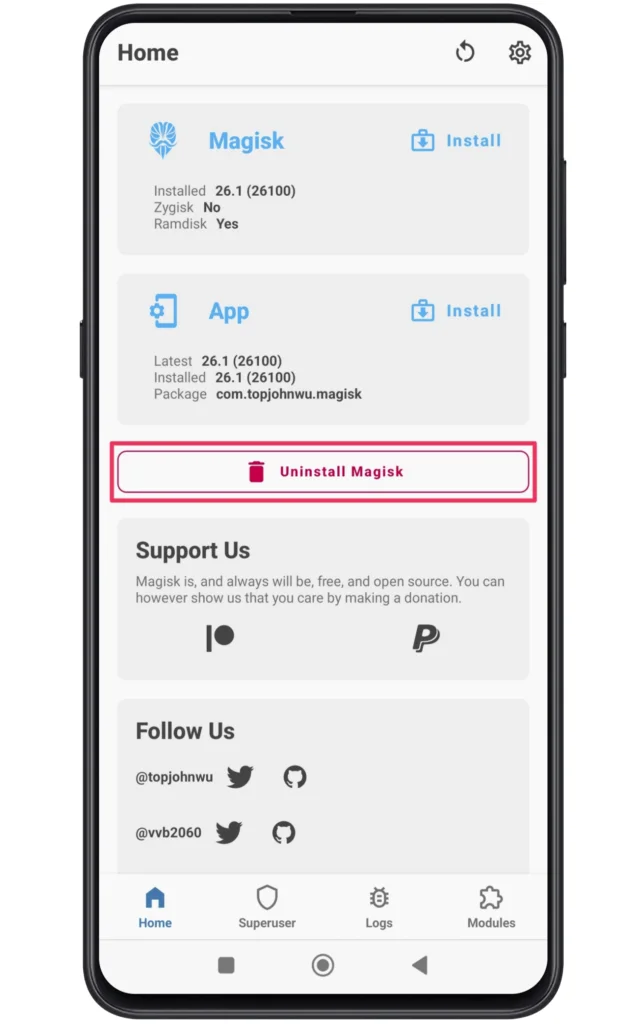
- Following this, select the “Complete Uninstall” option from the list.
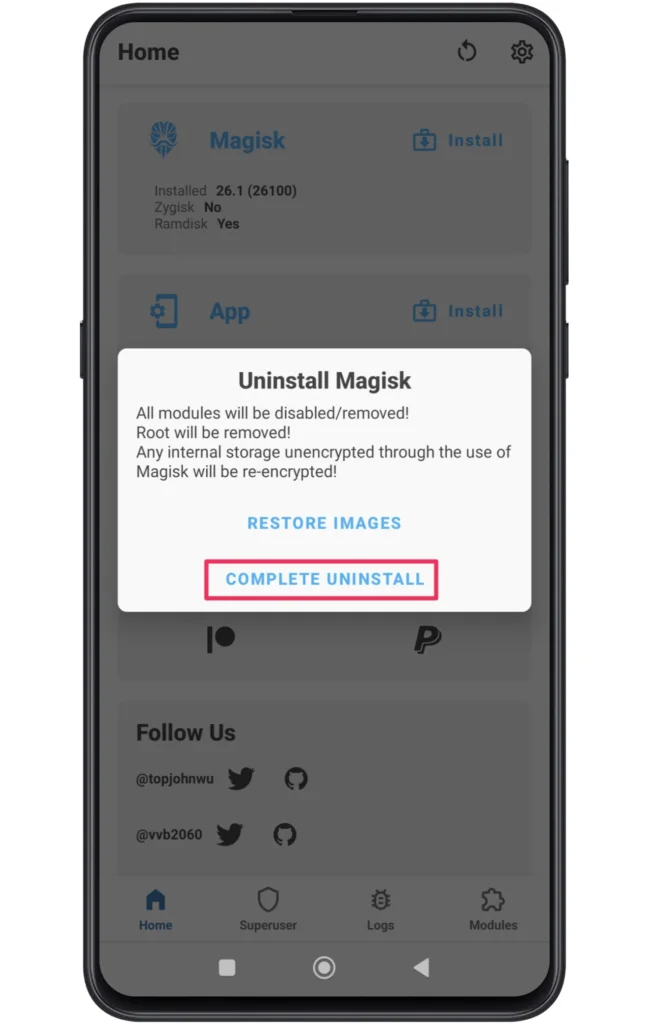
- All of the modifications will be removed from the OS in a few minutes.
- Eventually, reboot the device to finish the unroot process.
If you want to obtain the previous state, we would also recommend locking the bootloader. But it’s up to the users to decide what they want to choose in the first place!
Related Posts
Well done! Your OnePlus Nord 5 now has endless customization and optimization options after you’ve successfully rooted it. There are countless options available, ranging from installing unique ROMs to adjusting system settings.
Just keep in mind to exercise caution and to always make a backup of your data before making any big gadget adjustments. When you have root access, you may customize your OnePlus Nord 5 to fit your own tastes and requirements, making it genuinely yours.